Coaching
Healthy House Plumbing
After the interior framing and the roof were completed for our healthy house, the second phase of rough-in plumbing was done. This consisted of installing vertical pipes in the walls for the sink and laundry drains, as well as all of the water supply lines. The drain pipes are made of a hard black PVC plastic. Cast iron would have been a more inert choice, but it was more expensive. So to reduce cost we chose the PVC. It has only a very slight odor, and since there was not a large quantity of the pipe, and since it was going to be located behind plaster and foil-backed lath, that was a reasonable trade off for us. The vertical pipes connect to the horizontal runs under the foundation that carry waste water to the sewer. All of the drain piping was also connected to drain vents. These are pipes that run above the roof line and end there, open to the outside. This is standard building practice that helps ensure that large volumes of water can flow down drains without being impeded by back pressure.
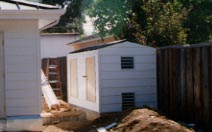
The supply piping brings water into the house from the city supply. In our neighborhood the city water is distributed in asbestos piping. The water mostly comes from local wells, and the piping in our area is relatively low pressure (about 45 pounds per square inch). Asbestos is supposedly only hazardous when the small particles are inhaled. However, the water doesn't taste very good, is chlorinated, and has numerous other pollutants in it (in quantities small enough to be considered "safe" by the city water department). It runs from the street through about 75 feet of PVC pipe to a utility shed that is completely separate from the house. The shed is about four feet wide by 12 feet long and six feet high, and it sits to the south of the house in an area about 10 feet wide that separates the house from the fence at the property line. The shed also has a concrete foundation, and it was built in the same style and with the same materials (framing, siding, roofing) as the main building. The shed is shown in the photo below.
The PVC pipe terminates at the shed, where the water is piped into a whole-house water filtration system. The first part of that system removes fine particles from the water. The second stage removes the chlorine and other pollutant chemicals using activated carbon filters contained in a stainless steel housing. From that point on, the water is piped through copper pipes. The copper was soldered together using a lead-free solder. PVC was acceptable for the run from the street because it was relatively short, it was probably used in the city water distribution system at some point, and the water was filtered afterwards. It was important to filter the water before it is heated, since carbon filters don't work very well with hot (above 110°F) water.
The water heater is also located in the shed. It is a gas-fired heater. We chose gas because it is so much less expensive to operate than electric heaters. Gas also has the advantage that many BTUs can be delivered quickly. We put this to work for us by installing an instantaneous type tankless water heater. This means that the water is heated as it passes through the heater. There is no holding tank. This type of heater is more energy efficient, and it also has the feature that the burner is only operating when hot water is being used. By locating the heater in the shed, all combustion gases are kept outside, and the natural gas piping, which is prone to leaking, never has to enter the living area.
From the shed, the water is piped through an insulated raceway into the house. All of the supply piping was run through the attic space rather than in the foundation, so that if it were ever to develop a leak, it could be easily reached for repair. We did not install a water line to the refrigerator for ice cubes, since we knew that we would not be drinking the city water, even though it would be filtered (we try to only drink glass bottled spring water).
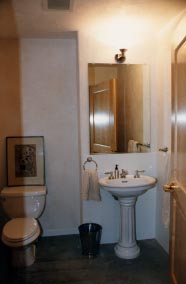
Much later on, during the finishing phase of the construction, the sinks, shower, bath tub, toilets and cabinets were installed. We chose porcelain pedestal type sinks for the bathrooms because they don't have a storage area underneath them. Storage areas under sinks tend to be dark, damp and warm -- perfect conditions to encourage mold growth. The pedestals can also be installed slightly away from the wall, so that there isn't a seam or joint where water can linger and foster mold growth. The photo below shows the guest bathroom -- which is also fully handicap accessible.
In the kitchen and mud room we also wanted sinks and a work space that would be easy to clean and that did not have joints or seams. We decided to use a material called Corian. It is a solid material, not a veneer, and it can be molded and shaped in seemingly limitless ways. The end result has no seams around the sink (the sink itself is also made of Corian), a full-height coved splash, and an attractive 1 1/2" full-round bullnose edge. We also used Corian for the counter on the kitchen island. It is very easy to clean. The coved corners and invisible seams mean that there is no place for water to linger, which discourages mold growth. An alternative material is granite. Large slabs of granite make attractive counters. However, it is not possible to have an invisible seam at the sink. And although outside coving is possible for a bullnose type edge treatment, inside coving is not possible -- and it is the inside coving that helps eliminate lingering damp areas. Granite is also much harder to repair in case of damage, and granite can also be somewhat radioactive. The only problem with Corian is that the installation process requires a fair amount skill and the use of some fairly toxic solvents. Fortunately, when dry there is absolutely no residual odor. The Corian dust that is generated by sanding and polishing the material is also a problem. However, we were able to clean it up fairly easily using a good vacuum cleaner and damp dusting.
In addition to using Corian for the kitchen sink and counter, we also decided to use it in the master bathroom and in the kids' bath, for similar reasons. We had the shower surround custom made so that it was nearly completely seamless. One seam was required around the base of the master bath shower, where the walls join the custom-molded shower pan. Inside coved corners make the areas very easy to clean (I had tile showers for many years. It is really a joy to have a shower that is so much easier to clean.).
To help alleviate the dark damp storage area problem in the kitchen, we had the cabinet manufacturer put ventilation slots into the doors under the sink. This helps provide a little air flow, which reduces moisture. We also had them put in a stainless steel base under the sink, so that any accidental water leaks would be easier to clean, and so there would be no chance of rusting.
A second water filter is located under the kitchen sink. This is also a carbon-type filter like the second stage unit in the shed, except much smaller. The design is also different. It uses a carbon matrix cartridge that removes particles as well as any residual chemicals. The manufacturer actually certifies this particular unit (the "Seagull V") to produce sterile, injectable quality water. This final point-of-use filter removes not only any chemicals that the whole house system might not have caught, but it also catches chemicals that our local copper piping may have introduced.
For the other plumbing fixtures, we made our choices mostly based on aesthetics. We did try to pick things that had little or no plastic in them. The bath tub, for example, is a porcelain-on-steel type (not fiberglass). The door for the kids' bath is a glass and metal "frameless" type, that does not allow water to collect at the bottom edge of the sliding glass doors.
The shower door in the master bath is a seven feet high by three feet wide piece of glass (very heavy!), hung on three hinges. We made the base of the shower be at the same height as the bathroom floor. Combined with the nice wide door, it makes the shower fully handicap accessible. We also selected pressure-sensing valves for the showers. These valves adjust the amount of hot and cold water that they deliver, based on the current water pressure. This prevents scalding in the event one person flushes a toilet while another is taking a shower, for example. The photo below shows the door on the master bathroom shower, along with one of the two sinks. The two square openings on the upper left are designed to let water vapor escape quickly from the shower (through the air vent, which is also shown). This helps the shower dry quickly, which reduces mold growth.

Articles
diagnosis
detective
MCS/EI/CFIDS
protocol
oxygen O2MT
Healthy House
guidelines
location
foundation
floorplan
framing
flooring
electrical
plumbing
roofing
windows
siding
kitchen
Supplements
carnitine
cetyl myrist.
coq10
d-glucarate
glucosamine
IP6
Lipoic Acid
Vitamin E