Coaching
Healthy House Foundation
There are several different kinds of foundations that can be used for homes. In our area, the most common one uses a concrete perimeter, with a crawl space underneath. This results in a dark, often damp space under the house, which can be an ideal space for mold to grow.
We decided to use a slab on grade foundation. This way, there would be no air under the house to get contaminated. This type of foundation consists of a large, single slab of concrete with the same overall footprint as the entire house. We ended up using about 110 cubic yards of concrete for the foundation.
The structural design for the house resulted in having all of the interior walls be load bearing, in additional to the external walls. This meant that a concrete footing was required under each wall. The footings were 18 inches thick, compared to six inches for the rest of the slab. The structural design required all of the walls to be bolted to the foundation (which required a total of 525 bolts).
Since we had decided on a slab on grade foundation, and because we didn't want to have cold floors, and to go along with the design guideline of no natural gas in the house (and therefore no gas-fired forced-air heating), we decided to use a radiant heating system. We chose the one made by InFloor (a division of GypCrete Corp.). We also ended up with an electric heat pump in our ventilation system. Although this could theoretically heat the house by itself, electrical heating is much more expensive than radiant, and forced air heat not only leaves the floor cold, it's also relatively uneven.
The radiant heat system required laying several thousand feet of tubing in the foundation. Hot water is circulated through the tubing to heat the foundation, which in turn heats the house. InFloor makes a couple of different kinds of tubing. I selected a cross-linked polyethylene type, with an oxygen barrier. This is an extremely durable tubing, and the oxygen barrier will help to protect the pump and boiler from future corrosion. Some vendors suggest using copper tubing; however, I wouldn't recommend it. The problem is that if the foundation settles slightly, copper is much less forgiving than the polyethylene, and it is therefore more likely to leak. In fact, radiant heat in our area has developed a bad reputation because many buildings that were made with copper radiant heat systems later developed leaks, requiring the foundations to be extensively ripped up in order to fix the problems. The photo below shows the red radiant heat tubing.
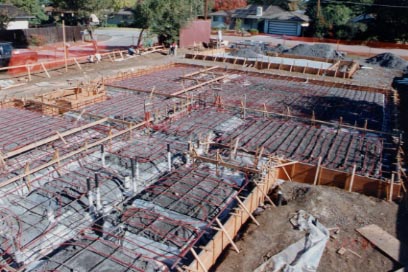
In order to keep moisture from getting into the concrete, which could result in mold growth, staining, and other problems, the foundation was built up in a layered fashion. First, the dirt was compacted to 92 to 93% of optimal, to limit settling and subsquent cracking of the concrete. Then six inches of gravel was put on the dirt to serve as a capillary break. This limits the amount of moisture that can seep up from the dirt into the foundation. Because the heating is in the foundation, a two inch layer of aluminum foil-faced extruded polystyrene insulation was put on top of the gravel. Because soil also acts as an insulator, the polystyrene only needed to cover the first eight feet from the edge of the house. The insulation and the remaining bare gravel was then covered with a 7 mil layer of plastic sheeting. The seams were overlapped about two feet and taped together with duct tape to prevent any "leakage" of water or mold from the dirt into the concrete. A two inch layer of dry sand was used to help level out the area, and to provide a better base for the concrete. Finally, 6 inches of concrete was poured on top of the sand. Although extruded polystyrene is a somewhat toxic material, the fumes are drastically limited by the aluminum foil facing and the other materials layered on top of it.
At this point in the construction, we had planned on having a hardwood floor. In order to attach the floor to the slab, metal strips would have to be nailed to the concrete. Although 1 1/4" nails were recommended, our installer tested 1" nails and found that they would work fine. Because we were concerned that the nails might poke a hole in the radiant tubing, we decided to add an extra inch of concrete on top of the tubing as a safety buffer. It also made the foundation a little stronger, and therefore hopefully more resistant to cracking. We used #4 rebar on 12" centers (about 5 tons worth of steel) instead of the usual #3 rebar on 18" centers to help give us some additional crack resistance. We wanted to reduce cracking as much as possible to limit moisture and mold coming up from under the concrete. In some areas, radon can also seep into homes through such cracks. We also used 5,000 psi (7 sack) concrete, instead of the standard 3,000 psi (6 sack) concrete, for the same reason (and not for structural reasons, so we didn't have to do any extra cost strength testing). One option we looked into was including metal strips in the concrete to help with crack resistance. We decided against it because of the cost, which would have been about another $50 per cubic yard.
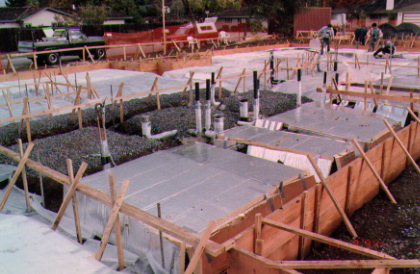
Conduits and plumbing stubs were put into the foundation before the concrete was poured. The conduits brought the main electrical, phone and cable TV in from the garage, and they provided a run from the breaker box to the utility shed, which is about five feet away from the house to the south, against a fence in the back yard. The plumbing drain and vent lines and some of the supply lines were also put into the foundation. The bulk of the electrical, as well as most of the plumbing supply lines, were installed later above the ceiling.
In order to keep our costs down a little, we decided early on that we would have finished concrete floors in a couple of parts of the house. The project room, laundry room, all three bathrooms, the master bedroom closet and the copier room in the office area all have concrete floors. These were poured at the same time as the foundation, and because they were 1 1/4" higher than the foundation (to allow for the thickness of the then-planned hardwood floors), special forms were required. We also planned for the shower pan to be sunk down, so that the shower floor would be exactly level with the bathroom floor, to make wheelchair access easy. This also required a special form.
We made sure to tell the company that did the foundation work for us that we wanted fresh wood for the concrete forms, and that we did not want them to use release oils of any kind. Some companies use diesel oil or paint or wax on the forms so that the concrete doesn't stick to the forms. However, if the forms are removed within a week or so after pouring, sticking isn't a problem with fresh wood.
After the concrete was poured, I sprayed it with water several times a day for three days to keep it damp and to therefore limit cracking. Concrete completely hardens within 28 days. At that time, there were no visible cracks. Seven months later we did have a few small surface cracks, probably due to standard concrete shrinkage.
We initially wanted to leave the concrete bare, but we decided that a sealer would be a good idea to protect against moisture penetrating the concrete from above and causing mold problems. So after 28 days, we had several coats of a non-toxic sealer called sodium silicate applied. This greenish liquid has almost no smell, goes on easily, and dries quickly.
Articles
diagnosis
detective
MCS/EI/CFIDS
protocol
oxygen O2MT
Healthy House
guidelines
location
foundation
floorplan
framing
flooring
electrical
plumbing
roofing
windows
siding
kitchen
Supplements
carnitine
cetyl myrist.
coq10
d-glucarate
glucosamine
IP6
Lipoic Acid
Vitamin E