Coaching
Healthy House Framing
The framing was started by putting up the exterior walls. All of the bottom plates (used to hold the framing to the foundation) had holes drilled in them with a small drill press, to accommodate the foundation bolts. This was a very time consuming process, sometimes taking several minutes per hole, because of the relatively thick material that was used for the bottom plates. We also went through a bunch of drill bits. If I ever build another house like this, I will buy or rent a punch instead of using a drill.
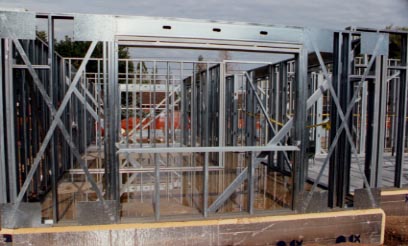
In California, we have energy efficiency requirements in the building code. It's called Title 24, and because of our metal walls, we had a little trouble at first meeting its requirements. We decided to build a double exterior wall to solve this problem. This was done by attaching two 2 1/2" bottom plates to the foundation. The most-exterior wall is 2 1/2" thick, and 1" inside of it there is another 2 1/2" wall. At the top of the wall, there is a 6" top plate. Both of the walls are attached to the top plate. The result is two 2 1/2" walls, with a 1" air space between them. The only reason we had any problems at all with Title 24 is that the people who do the certifications don't have accurate models for metal buildings. They assume that if there is a metal path from the outside of the building to the inside, then the entire wall is 100% thermally conductive, and so no amount of insulation will help you. Of course, this isn't physically accurate. Another good reason to use a double wall is that it will prevent cold spots on the inside wall that could result in condensation. If the walls were to get cold, moisture could settle there, which could result in mold growth. You can see the double-wall and other elements of the exterior wall framing in the photo below. The yellow material at the bottom is foil-faced foam insulation that was needed because of our in-floor radiant heat system.
As delivered from the factory, the metal framing was covered with a thin coat of oil. The oil was washed off of the metal using a solution of trisodium phosphate (TSP) in water. We used the powdered TSP in a box, not the green TSP-like stuff in a plastic bottle. TSP was chosen because of its excellant oil-cutting ability, and because it rinses off completely with water, leaving no residue or film. It also has no odor. However, it can be damaging to the skin and the eyes, so gloves and goggles were used by the people doing the cleaning. We started out by building a container about 16 feet long by about a foot deep and 18 inches wide out of wood. The container was lined with plastic, and then partly filled with TSP and water. The steel was dipped in the container and washed with cotton rags. The steel was then taken out of the container and sprayed off with a hose. This procedure was very effective, but it was also extremely slow and labor intensive. Later on, when another big batch of steel was delivered, we revised the procedure by eliminating the container and just using a mop dipped in a bucket of TSP, plus a hose. This sped up the whole procedure considerably. We ended up spending several thousand dollars on labor just to clean the steel.
As part of our design requirement to build an air tight structure, a 3/4x3/4" compressible gasket was attached to the "inside" exterior wall before it was bolted down. This prevents any air (or bugs!) from coming into the house under the bottom plates.
The double wall took our contractor (who had built many custom wood homes, but had never built a metal home) twice as long to build as they thought it would. The garage, which did not have double walls, went up about twice as fast. Part of the reason the house walls took so long was that we had to use thicker metal for the walls (14 to 16 gauge) than is commonly used for interior walls, such as non-structural tenant improvements in commercial buildings (20 gauge). Because of this, clamps were needed to hold the studs to the bottom or top plates while the screws were being put in. Because of the double wall with two bottom plates and one top plate, the walls also had to be built in place, rather than being built flat on the ground and then tilted up like in wood buildings.
I did not want to use plywood anywhere in the house, because it is made using formaldehyde, which is a known carcinogen. It is also damaging to the immune system, and is a "sensitizer", meaning that people who are exposed to it in quantity often develop sensitivities to other chemicals and organic allergens. Having no plywood meant that there was no sheathing on the outside of the building. In order to get the shear strength that we needed, the structural engineer decided to use X bracing. This is made from two 2" wide strips of metal in the shape of an X, attached to the outside of most exterior walls. Some individual braces required as many as 60 screws. X bracing was also used on the ceilings. Since some of those braces required very long runs, we had to special order bracing material from the supplier of the metal framing. We had been told that 2" material was available in lengths over 20 feet, but it wasn't. So we ended up using 4" wide material. A special jig was built to "stretch" the braces in place before the screws were put in. The location of the bracing wasn't shown very well on the house plans, so it ended up getting in the way of a few air vents and ceiling lights later on.
Most of the screws used in the framing were #12 box head self-tapping metal screws. Because of their box head, they stick out from the framing a little more than we wanted. So some smaller and flatter #14 Philips head screws were used in some places on the outside of the building, so that the aluminum siding would attach more easily when it was applied later on.
A total of over 60,000 screws were used in the building. They were applied without the benefit of self-feeding screw guns (not available for the size screws we were using). Also, we found battery-powered drills to not be powerful enough to be worth while.
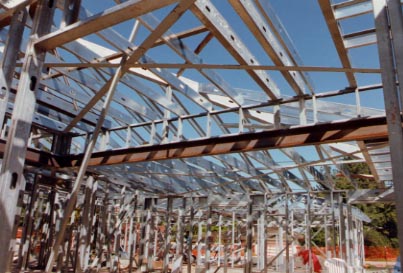
My contractor ended up having to develop a number of new techniques to build certain parts of the structure. Particularly in the roof, which was also framed out of metal. We did not use a truss system because the trusses are normally attached to each other with plywood. We may have been able to work around that using X bracing, but trusses also severely limit the available attic space, which may not have left us with enough room to run the large ventilation ducts that we used. We had originally wanted the air ducts to be contained in the same "conditioned" air as the rest of the house -- which would not have been possible using trusses. We later decided that approach was too expensive. So, rather than going with trusses, we chose to use a structural hip roof. Besides leaving us with a roomy attic, this type of roof is also much more attractive. Unfortunately, it was also more expensive.
Some of the places where hips attach to ridges and king posts required the development of some techniques that, as far as we know, are not published in any of the standard metal framing books or manuals. Our contractor was able to start with wood framing techniques and adapt them to metal. The result was a great looking roof. The framing took four people about four months to complete.
We also ran into a problem where the structural designer had originally specified some 14" wide steel beams that were only available from a plant on the east coast. Since it would have cost about $3,000 to have the material shipped from that plant, we had the design modified to use iron I-beams instead. The I-beams were fabricated locally for a total of about $1,200; a substantial cost savings. All of the beams and other elements of the structure were lifted into place by hand. Cranes or other special lifting equipment were not required (except for the forklifts that were needed to lift the material off of the truck when it was delivered). You can see the I-beams and other interior framing in the photo below.
Articles
diagnosis
detective
MCS/EI/CFIDS
protocol
oxygen O2MT
Healthy House
guidelines
location
foundation
floorplan
framing
flooring
electrical
plumbing
roofing
windows
siding
kitchen
Supplements
carnitine
cetyl myrist.
coq10
d-glucarate
glucosamine
IP6
Lipoic Acid
Vitamin E